
It's Monday!
Here is the first installment of a peek into my new printers drawer!
I found my printers drawer at an antique mall for $16. It was in great shape compared to the $10 drawer that had crud stuck to it and broken slats. I brought it home, cleaned out all the little compartments and sprayed it with a varnish to help it last a bit longer. I started cleaning off my bead counter to make room for it and began to fill the first compartments with patina-ted rings. But I stopped as soon as I saw that a lot of the dark components were not showing up against the dark wood. So I stood over it for 4 hours, cutting little rectangles of patterned papers to fit into the bottoms of the drawer.
Then and only then could I start to fill it with my treasures.

Compartment No.1
The first compartment contains chain links I had to cut. At first you would think they are useless, because you can't re-solder once the patina has been lacquered but with a little wire and some time you can link them together as a multicolored, textural chain segment!
See!?!?

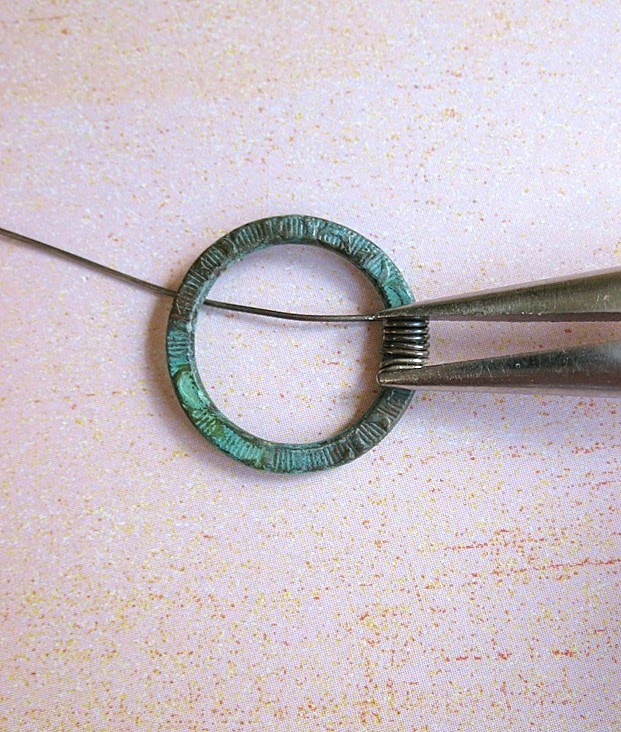
To create your own wire-wrapped chain start by pressing your link seam closed as close as you can. Cut a 3" piece of wire, I chose sterling to add contrast, and place the middle of the wire to the side of the cut.

Push the bottom part of the wire through the link and bring it up around the back to the top of the link. Press the wire in to hold it as you push the top wire over around the back and through the center of the link and up again.

Keep wrapping until the seam is completely enclosed in wire. If you want a messy wrap, cut a longer piece of wire. Use the fine tips of your chain nose pliers to position your wraps more closely together.

Chose your next link and close it over the wrapped link.

Start wrapping this new link closed with another piece of wire and continue until you have the length of linked chain that you want or need. Now this doesn't have to be a stash of patina-ted chain, this can be done with any chain you have had to cut apart. Some of them have a beautiful texture and you just can't throw them away! I strapped on some leather (heehee) and clasped it with a forged sterling clasp and another cut, patina-ted link.


Recycled Patina-ted Chain Segment.

Just think, this small handful made for 1 lovely necklace; think of all the necklaces, bracelets and even earrings I could do with the rest! But that will have to wait, I have a book review to do and another Missficklemedia Loves post to get ready.
Do you want a clue as to who it will be?
She is a season.
Great idea about the paper, it really helps. Nice chain necklace leather and all!
ReplyDeleteOk I am so totally hooked! I love that you gave a tutorial (I have some cheap ones from walmart to try this with) Can't wait for the next installment!
ReplyDeleteHugs
Ooooh, I'm so glad I saved the cut links from here and there. Yours are awesome, I love x3 that necklace!! I always knew there was a way to use the cut links, I think I'll buy more of your chain and cut it apart! I couldn't do that, really. Can't wait to see the other compartments, Shannon!
ReplyDeleteOh, those colours are absolutely gorgeous! I love how you have taken something which many people would throw out, and made something beautiful. Love it!
ReplyDeleteLove this idea! I can't bear to part with little bits of chain and other things. What is totally cool about this is that you couldn't really get that colour mix very well if you hadn't done it this way. Inspired. Oh, I think I get the clue :-)
ReplyDeleteThat's such a good idea! I love how the necklace turned out too. All the colors looked great together. :)
ReplyDeleteHappy Beading,
Jessica
Oh that new chain looks so good. The wire adds interest and character to it all. Very inspiring. Thanks for sharing!
ReplyDeleteLove the idea of using the chain like that. I have done that with some wonderfully textured copper link chain that I have. Now I will never through out another link!
ReplyDeleteI am so excited to see what is in your drawer...makes me excited to organize all 21 of mine! I have an antique Hamilton (made down the road in Two Rivers WI!) cabinet. Mine is complete, all hardware, the outside finish is sublime. But the inside...ugh. 100 years of printers dust does not come out easily. Luckily for me I have a friend who refinishes furniture. He cleaned each drawer with some sort of furniture spray, spray painted the entire insides first black (to cover up the stained wood) then white to let all the lovelies I put in it stand out. You might want to just spray paint it white and then seal it. It makes everything POP!
And I am guessing SummersStudio with LeAnn Weih. Am I right?
Enjoy the day, Shannon!
Erin
I have an old end table base(probably had a glass tabltop) that I use for my printer's drawer, so handy!
ReplyDeleteVery clever idea! I'll have to try that about the wire wrapping!
ReplyDeletethroughout your blog, your photography is really lovely, simple and precise. Just perfect.
ReplyDeleteI found some on Craigslist for $10, but they are pretty dirty. I've cleaned them up as best I could, I was figuring I'd end up cutting paper out like you did. Happy to see it works!! Great chains!!!
ReplyDeleteLOVE LOVE LOVE IT!
ReplyDeleteThis is super cool, Shannon. Love this idea!
ReplyDeleteErin S
Shannon You have No boundrys to your Talent and Ideas! Its people like you who keep the juices going for so many! Thank you. Beautiful necklace!
ReplyDeleteGreat idea, I usually save my cut links, now I know what to do with them, since I do not solder.
ReplyDeleteSmart idea with the paper, I have a dark drawer with beads in it, but I never thought to do anything about it. Don't you wish you had the whole cabinet?
ReplyDeleteThanks for sharing,
Jennifer Jangles
what a wonderful idea. I love the look of the finished chain. Also wish I could find some of those drawers for all my stuff!
ReplyDeleteWhat a wonderful tutorial. I would have punched holes for jump rings but your wire work really adds character. I saw this a while ago. But only just shared on my Facebook page - http://www.facebook.com/TheBeadingGem
ReplyDelete